What is Google Analytics and How to Use It?
15.04.2022
All your needs from a single point - server solutions
Dedicated server rental with fully dedicated resources, also known as Dedicated Server or Bare Metal Server
Virtual Servers (SSD VDS)Scalable, high-availability server rental services with high-performance cloud server solutions.
Fully developed by Netinternet, scalable and secure cloud server platform deployable in seconds
GPU-Based AI InfrastructureHigh-performance GPU-based server solutions created on a project basis for your AI and machine learning projects
Server & Hardware ProcurementEnd-to-end procurement and configuration services for servers, network equipment and infrastructure components
Customized Infrastructure SolutionsSecure and scalable infrastructure solutions architectured according to needs for enterprise projects
Smart cabinet systems with per-kWh billing, equipped with dedicated power analyzers and sensors
Server Colocation (Co-location)Affordable per-kWh billing server hosting service on shared cabinets
Premium ConnectivityHigh-quality, high-capacity connectivity with redundant multi-carrier, multi-IXP and high-capacity volumetric Anti-DDoS protection
Telecom Data Center CircuitAffordable and high-capacity internet access through Turk Telekom MPLS network via dedicated data center access circuit
Cross-ConnectCross-connect services offering direct connection between network carriers inside and outside Netinternet data center
IP Address PricingIPv4, IPv6 address rental, ASN rental and RIPE LIR admin management services with affordable pricing and announcement management automation
Installation, configuration, regular maintenance, updates and 24/7 monitoring of your server operating system
Managed InfrastructureEnd-to-end management of your entire IT infrastructure including data center, storage, virtualization and backup
Managed NetworkProfessional management and monitoring of network devices (router, switch, firewall) configuration, optimization and performance
Managed Cloud (Public / Private)Design, management and optimization of your public and private cloud infrastructures to meet your cloud needs
Managed Security24/7 monitoring, analysis and instant response services for your enterprise against cyber security threats, SOC/SIEM applications
Managed Backup & Disaster RecoveryBackup and disaster recovery plans, implementation, operation to ensure your data security and business continuity
Fully domestic, KVKK compliant, 100% compatible with Outlook and all mail programs, professional, uninterrupted email service
Manageable bulk email sending services with high delivery rates for your marketing campaigns
Secure archiving of all your email traffic to protect corporate memory and comply with legal requirements
Free Email Migration ServiceWherever your email service is, we migrate you to Netinternet corporate email solution for free!
Fast and reliable hosting packages with easy setup and management using cPanel, the worlds most popular hosting management panel
cPanel Reseller HostingFully customizable cPanel-based reseller hosting solution for starting your own hosting business.
DirectAdmin Reseller HostingScalable and cost-effective reseller hosting powered by lightweight DirectAdmin control panel.
Free Hosting Migration ServiceProfessional migration services to move your existing systems to Netinternet data center infrastructure
Fully developed by Netinternet, protect against cyber attacks with our Web Application Firewall solution
AntiDDoSHigh-capacity volumetric Anti-DDoS protection provided free by default on all our services
VPN SolutionsSecure, encrypted tunnel connections for your remote offices and employees with our managed VPN solutions
Layer4 Stateless FirewallLayer4 stateless firewall solution for filtering and directing incoming traffic
SSL CertificatesSecure connection solutions with free and paid SSL/TLS certificate options.
Penetration TestsPenetration tests performed by third parties in cooperation with TSE-approved testing firms
Domain registration and easy management at the most affordable prices in all popular extensions (.com, .net, .org, etc.)
Domain Transfer ServicesTransfer your domains to Netinternet for professional domain management services
Domain ResellerFlexible and reliable reseller program and integration services for offering domain registration to your customers
Free hosting service for domains registered or transferred to Netinternet
Flexible and manageable license solutions with monthly rental model for cPanel, the most widely used control panel for Linux servers
Plesk LicensesLicense options for Plesk control panel compatible with Windows and Linux, suitable for different user and domain needs
DirectAdmin LicensesAffordable and long-term license rental solutions for DirectAdmin, known for its lightweight and resource-friendly structure
LiteSpeed LicensesAchieve speed, stability and resource efficiency for your web applications with LiteSpeed high-performance web server
CloudLinux LicensesCreate secure and balanced per-user systems with CloudLinux offering resource isolation and stability on shared servers
Microsoft LicensesMonthly, legal and flexible licensing options under SPLA for Windows Server, SQL Server and other enterprise Microsoft products
Infrastructure solutions tailored to your industry needs
High-density infrastructures, multi-tenant architectures and SLA-focused sustainable data center solutions for hosting and cloud providers
High-performance, secure and uninterrupted e-commerce infrastructures resilient to sudden traffic surges during campaign periods
Developer-friendly infrastructure solutions with CI/CD compatible, API-supported, automation-ready flexible resource management
Scalable, high-availability and continuity-focused cloud infrastructures suitable for SaaS architectures serving many users
GPU-based high-performance and scalable infrastructures for big data processing, model training and high computation tasks
Multi-client management compatible, quick setup, high-performance and flexible web hosting infrastructures
High bandwidth and low latency infrastructure solutions for live streaming, video and heavy content traffic
Regulation-compliant, Tier-3/Tier-4 standard, highly secure financial infrastructures ensuring uninterrupted service
Long-term, sustainable and secure infrastructure solutions compliant with regulations and data security requirements
Low-latency and high-availability infrastructure solutions compatible with Industry 4.0, IoT and production automation systems
Highly secure and uninterrupted health informatics infrastructures prioritizing patient data privacy and continuity

Adding value to your business with technologies fully produced by Netinternet
Protect your web applications against advanced attacks with our 100% domestic WAF platform HEIMWALL
Ilkbyte - Cloud Server ServiceScalable and high-performance cloud servers deployable in seconds with our domestically developed orchestration infrastructure
Netrafix - Bandwidth MonitoringManage 5651 compliant logging and bandwidth billing (Burst, Traffic Quota, 95th Percentile) in one platform with sFlow, NetFlow and IPFIX supported Netrafix
Secure Internet - For ISPsKeep your DNS traffic in your own network with 100% domestic DNS software developed for authorized ISPs
DirectIP - IP Management System100% domestic IP management platform developed by Netinternet for centralized IP address, subnet, VLAN and DHCP management
RuleDNS - Rule-Based DNS ManagementDynamically manage DNS responses with rule-based RuleDNS, easily integrate CDN and services with API support.
Technical documentation and references for infrastructure, integration and operation processes.
Technical documents and whitepapers on architecture, integration and operations for our platform and infrastructure solutions.
API DocumentationAPI endpoints, usage scenarios and automation examples for integration with our platforms.
Peering PoliciesReference network policies explaining our network architecture, traffic exchange principles and peering criteria.
Frequently Asked Technical QuestionsClear answers to frequently asked technical questions about infrastructure, security and operational processes.
System StatusStatus page for real-time status, planned maintenance and past outages of our platforms and services.
Our physical data center infrastructure offering high security and uninterrupted service with fully redundant infrastructure.
Our corporate data center facility designed with high security standards and redundant power and cooling infrastructure.
Power, Cooling, SecurityFacility architecture designed for critical infrastructures with redundant power lines, climate systems and multi-layered physical security.
Internet Access PointsLow-latency and high-availability backbone connections through multiple operators and internet exchange points
Uninterrupted connectivity infrastructure with multi-carrier connections, redundant backbone and high-capacity network architecture
Network PoliciesSustainable network operation policies with transparently defined rules for traffic management, peering, security and capacity usage
Planning and ProcessesScalable and controlled network management approach with pre-designed network capacity planning, growth scenarios and operational processes
Integration of different data center infrastructures under a single operational structure with secure connections and standard architectural principles.
Operational StandardsMonitoring, access, change and incident management processes in integrated infrastructures according to Netinternet operation and security standards.
Continuity and Redundancy ScenariosScenario-based continuity solutions for geographic redundancy, disaster recovery (DR) and business continuity requirements.
We provide auditable and sustainable infrastructure standards with our certifications for information security and service continuity.
Security PolicyWe ensure protection of infrastructure and data with our security policies covering information security, access control and risk management.
KVKK ComplianceData processing and storage structure compliant with KVKK and related regulations with defined technical and administrative measures for personal data protection.
Quality PolicyOur quality management policies within the scope of ISO 9001 for continuous improvement of service quality.
Service Management PolicyOur policies and standards governing IT service management processes within the scope of ISO/IEC 20000-1.
Business Continuity PolicyOur ISO 22301 compliant policies and procedures ensuring business continuity against possible outage scenarios.
Incident Management PolicyOur incident management processes and action plans for the detection, response and resolution of security incidents.
Supplier Security PolicyOur policy governing information security requirements and risk assessment processes in supplier relationships.
Disclosure TextText prepared within the scope of our disclosure obligation regarding the processing of your personal data under KVKK.
Cookie PolicyOur policy regarding cookies and data collection practices used on our website.
Hosting Provider and Legal Obligation PolicyLegal obligations we fulfill as a hosting provider under Law No. 5651.
Knowledge, experience and real usage scenarios about infrastructure, network, security and cloud technologies.
Technical analyses, sector evaluations and current content about data center, network, cyber security and cloud technologies.
Case StudiesReference case studies describing needs encountered, solutions applied and outcomes achieved in real projects.
Events and AnnouncementsEvents we attend and organize, technical meetings, launches and current announcements about Netinternet.
Strengthening the digital backbone of enterprises with infrastructure solutions designed for high availability, security and operational continuity.
A domestic and independent technology company developing its own infrastructures and platforms in data center, network and cloud technologies.
Why Netinternet?Transparent, auditable and sustainable service approach managing its own data center, network infrastructure and software.
ChronologyTimeline showing our infrastructure investments, technological development and growth milestones from establishment to today.
ReferencesInstitutions we serve in different sectors, our solution partners and success stories we realized together.
Commercial InformationCorporate information area providing quick access to company title, legal information, partnership structure, management and official documents.
CareerCareer opportunities for teammates who love producing technology, take responsibility and aim to grow together.

After registering a domain name, simply associating the domain name with a hosting account is not sufficient to publish your website. Your website also needs a healthy DNS configuration to work properly. In this article, we will provide information about correctly editing the Edit DNS Zone content on the server.
Name Server IP Addresses
We recommend entering Name Server records differently. For example,
ns1.ni.net.tr IP: 95.173.189.2

ns2.ni.net.tr IP: 95.173.190.2
let’s say.
You will need to enter these records in Edit DNS Zone as shown in the image at the link below.
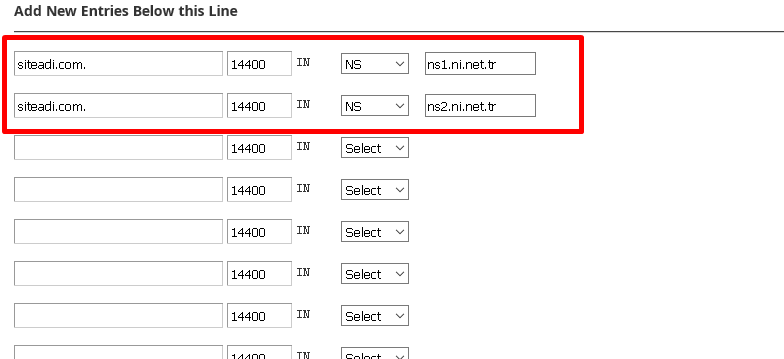
siteaddress.com.       86400    IN        NS        ns1.ni.net.tr  or ns1.domainname.com

siteaddress.com.       86400    IN        NS        ns2.ni.net.tr  or ns2.domainname.com
A Record (Glue Records)
Define the DNS records you have created or obtained from your service provider and started using as A records. For example, define the ns1.siteaddress.com and ns2.siteaddress.com DNS records by adding them as A records with ns1 and ns2 from the siteaddress.com DNS zone. Specify the IP addresses as the IP address where the DNS is running.
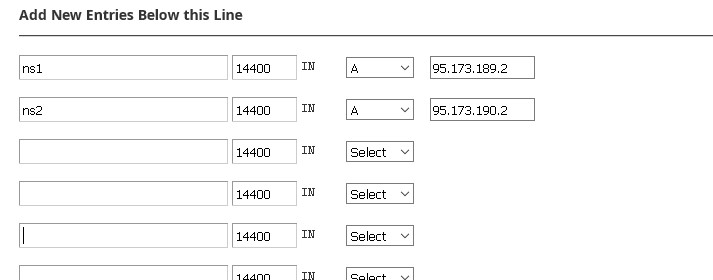
ns1                       14400    IN         A        95.173.189.2

ns2                       14400    IN         A        95.173.190.2
MX Record
MX records will be automatically created during installation when you purchase a hosting account that includes email service. However, if you want to use this service from email service providers such as Yandex or Gmail, you will need to edit these MX settings.

siteaddress.com. 14400 IN MX 0 siteaddress.com.SPF Record
Basically

siteaddress.com.       14400    IN        TXT     “v=spf1 +a +mx +ip4:IP_ADDRESS ~all”

A record like “v=spf1 +a +mx +ip4:IP_ADDRESS ~all” will be created.
After adding this record as well, everything you need to do for healthy email exchange is complete. You can now use email addresses belonging to your domain name.
After making all these settings, you can check whether there is a DNS problem from the address below.
www.intodns.com/siteaddress.com

Netinternet Bilişim Teknolojileri A.Ş.'de teknik konularda liderlik yapıyorum. 15 yıldır bu alanda çalışıyorum ve özellikle sistem yönetimi, ağ teknolojileri ve yazılım geliştirme konularına odaklanıyorum.
* Your comment will be published after approval.


We use cookies to provide you a better experience. If you give permission, some data may be shared with our providers abroad. For more information, you can review the Cookie Policy page.
Required for session, security and basic interface functions. If blocked via browser settings, the site may not work correctly.
These cookies enable advanced features such as videos, live chat and personalization. They may be set by our own services or third-party providers. Some functions may not work correctly if these cookies are disabled.
Used to analyze visitor traffic and site performance. These cookies help us anonymously measure which pages attract the most interest and how the site is used.
These cookies may be set by third-party service providers on the site. They may be used to deliver content based on your interests and to make services more relevant.
Comments
0No comments yet. Be the first to comment!