What is Google Analytics and How to Use It?
15.04.2022


Ubuntu is a free and open-source Linux-based operating system. It is developed for computers, servers, and smartphones. The Ubuntu project was launched with the aim of making Linux and free software a part of the daily lives of computer users, and its first stable desktop version was released in October 2004. With more than 40 million users today, Ubuntu’s desktop version is the most widely used desktop Linux distribution in the world. We will cover the installation steps using the Ubuntu 16.04 Server version.
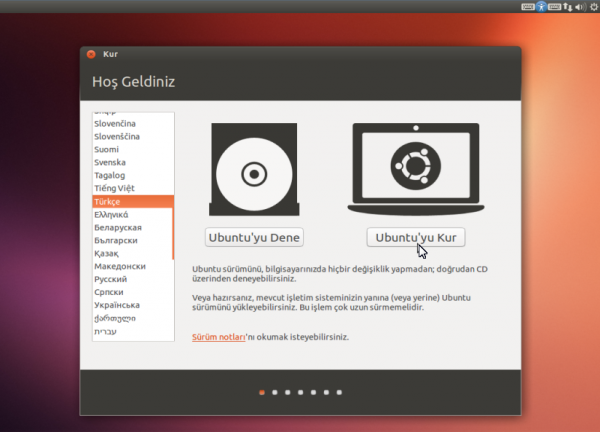
When you start the computer with the Ubuntu DVD or USB drive you created, the installation screen below will greet you after a few minutes.
When we select the Turkish language option from the list on the left, the options to try and install Ubuntu appear as shown in the image. Here we continue by clicking the “Install Ubuntu” option.
On the screen below, a check for sufficient disk space and an internet connection check are performed. If an internet connection is not automatically established at this stage, you can establish the network connection (wireless, etc.) by clicking the network settings button in the upper right corner of the screen. An internet connection is not required for installation, but if an internet connection is established, Turkish language packages will be automatically downloaded and installed. Of course, you can also install the language packages yourself after installation.
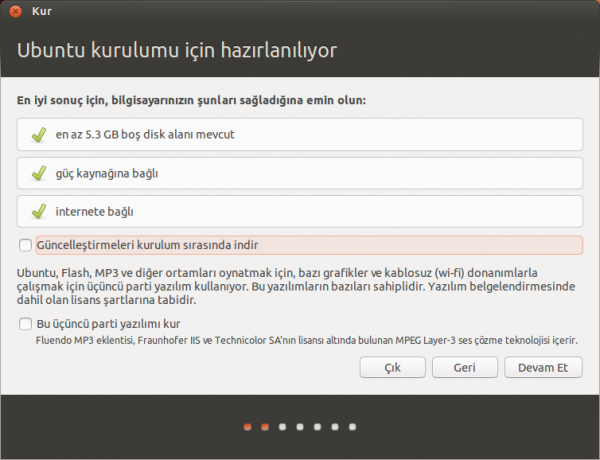
Download updates while installing: If you check this option, the installation process will take longer depending on your internet connection speed. It is still recommended to download and install updates during installation.
Install this third-party software: This option installs the necessary plugins to play MP3, Flash video, and other media in Ubuntu, as well as TrueType fonts such as Times New Roman and Arial, and some other plugins. Since all these plugins are not included in the Ubuntu installation file due to restrictive characteristics in their licenses, they can be installed during installation or after installation. If you do not install these third-party software during installation, you can install them later through the Synaptic Package Manager (the name of this plugin is “ubuntu-restricted-extras”). Now we have reached the most important stage of the installation.
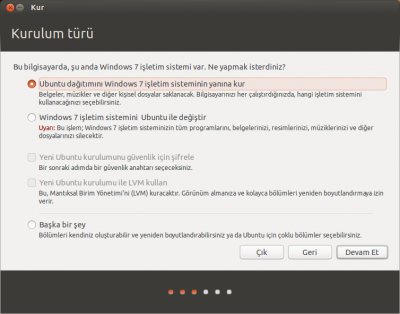
If Windows is already installed on your computer, a screen like the one above will appear at this stage.
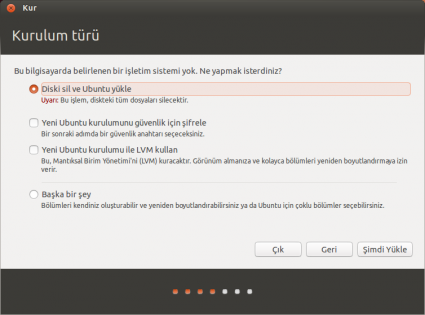
If no operating system is installed on your computer, a screen like the one above will appear.
Install Ubuntu alongside Windows: This option is for users who want to install Ubuntu alongside Windows on a computer that already has Windows installed without removing it. Installing Ubuntu alongside Windows without removing it can also be done using the “Something else” option at the bottom of this screen, but using that option is a bit complex and requires experience.
Replace Windows with Ubuntu: This option deletes Windows and the documents on your computer and installs Ubuntu in their place.
Encrypt the new Ubuntu installation for security: With this option, we can add a password to the installation to control access and interference by others.
Use LVM with the new Ubuntu installation: With this option, we install on a disk configured to be expandable in size. This does not require a special disk. If we make this selection, our disk will be configured with the ability to increase the disk size without harming the data in the future.
Something else: This option allows you to configure the disk in a way that is specific to your needs. Using this option is a bit complex and requires experience.
Let us proceed by checking the “Something else” option.

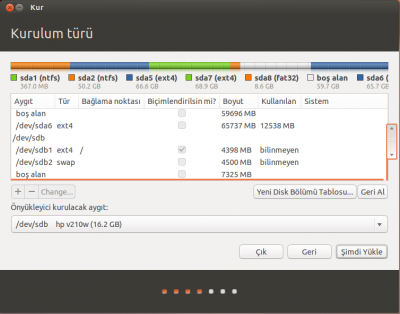
Then a disk partitioning table showing all current partitions of your hard disk and their properties will appear, similar to the one below.
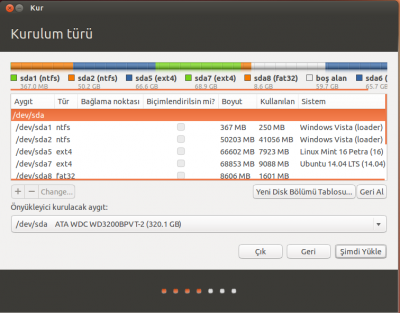
As you can see in our example in the image, multiple operating systems are installed on my system. Now I will partition my 16 GB of free disk space and install Ubuntu.

The disk I will work on is dev/sdb. This section may be different for you. You may also be working on your main disk. I chose this section to explain since the disk is completely empty.
Now I select the “free space” section below the selected section in the image and press the “+” button at the bottom right.
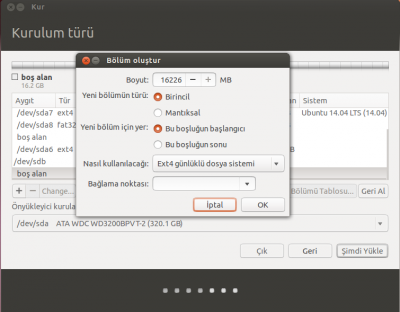
A window like the one above appears. Let us explain this window a bit:
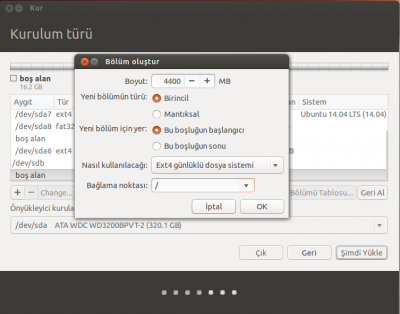
Size: This section is the size of the partition you will create. I will install Ubuntu in this section. Since this article is for educational purposes, I created 4400 MB of space for Ubuntu. Of course, this is up to you. You can create as much space as you want.
Type for the new partition: Two options appear here: “Primary partition” and “Logical Partition”. A maximum of 4 primary partitions can be created on a disk. However, a logical partition can be divided into many partitions within itself. For example, on a 16 GB disk you can create 4 partitions of 3 GB each. Because the disk supports this. But if you partition a section of the disk logically, it means you can later divide this section into as many partitions as you want. Again, in this article we will partition as a primary partition.
Location for the new partition: Although this section may not concern us much in the future, it is useful to know that it asks which side of the disk to partition.
How to use: This section asks what the file system of the partition to be allocated will be. Since we plan to install Ubuntu on this partition, we selected “Ext4 journaling file system”.
Mount point: For the disk partition where you plan to install Ubuntu, you must set this field to “/”. (This sign means root directory and is related to the Linux file system hierarchy…)
After making the relevant settings, press the OK button.
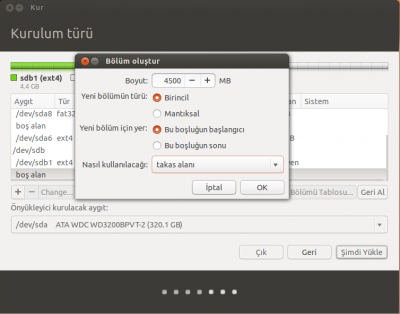
We have prepared the disk partition where we will install Ubuntu; now it is time to create a partition to be used as swap space.
Swap space: This is a partition that the operating system uses when computer memory is insufficient to compensate for the shortage. It may be advisable to allocate around 3 to 5 GB for swap space. Allocating a very large area for swap space will not provide any additional performance benefit.
I repeat the operations I did above to create a new partition for swap space purposes. While creating the partition, I fill in the relevant fields as shown and press the OK button again.
Since I have completed all operations without issues, I can press the “Install Now” button.
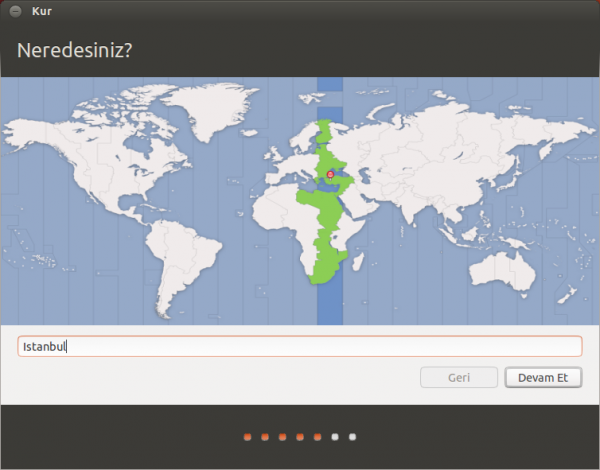
Then the screen comes where we will answer the question “Where are you?”. Here you can select “Istanbul” for Turkey.
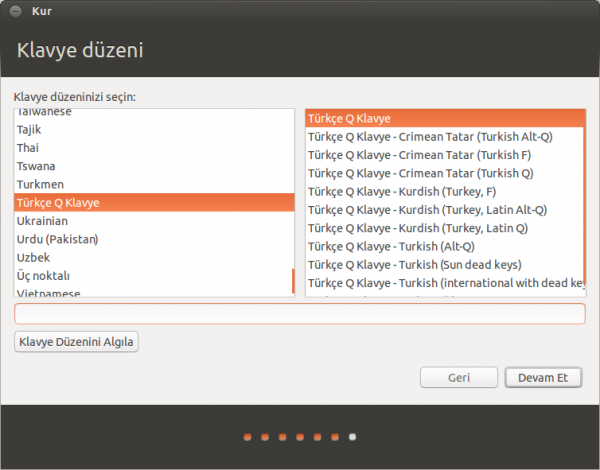
Then the “Keyboard layout” selection screen appears. Here, under normal circumstances, our keyboard layout will be automatically determined, so we generally do not need to do anything. The “Detect Keyboard Layout” button here can also be used to detect the keyboard. For this, after clicking some Turkish characters on the keyboard, you can click this button to detect the keyboard.
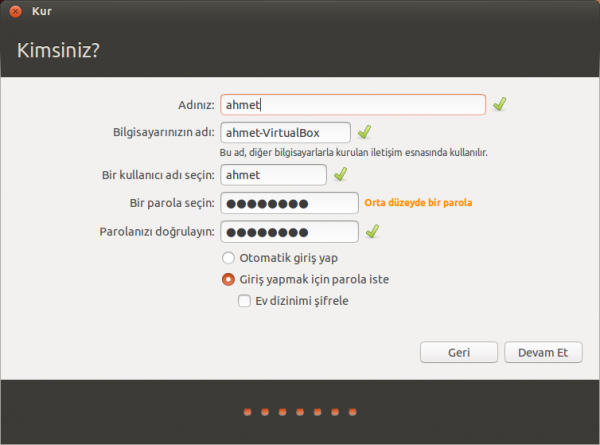
At this stage, we enter the name of our computer and the name of our user account. If the password we set is at least 6 characters long and contains letters, numbers, ?-/ etc. characters, Ubuntu will approve our password and say “Good Password”.
Log in automatically: If you want to log in directly without entering your user password every time you open Ubuntu, you can check this option. Even if you do not check this option, you can enable automatic user login through System Settings after installing Ubuntu.
Require my password to log in: This is the opposite of the option above. This option is checked by default.
Encrypt my home folder: By checking this option, our user home directory under the /Home folder can be encrypted to control access by others.
Then when we use the “Continue” button, the “Install” screen that comes with the “System Installing” message starts the process to complete the installation.
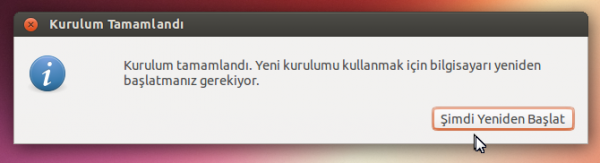
When the installation is complete, we receive the “Installation Complete” message. After saying “Restart Now”, we can start using Ubuntu.

* Your comment will be published after approval.


Comments
0No comments yet. Be the first to comment!